About BizMessage Agent
dk techin’s Kakao i BizMessage is a corporate messaging service that allows our clients to send various types of messages, including Alim Talk, Friend Talk, SMS, LMS, MMS, RCS, and Naver TalkTalk, to end users of KakaoTalk. There are two ways to implement the function of the Kakao i BizMessage service: using BizMessage API and installing BizMessage Agent. This document only describes how to install and set BizMessage Agent.
Note
To use the BizMessage service, you need to have a contract with dk techin. For more details on the service contract, please refer to the BizMessage(ENG) document.
System Requirements
The following system specifications are required for the installation and server operation of BizMessage Agent.
표System Requirements| Category | Description |
|---|---|
| Server operating system | Available on Windows, Linux, AIX, Solaris - Operating system on which Java 1.8 or higher can be installed |
| Server operating environment | JAVA 1.8 or higher |
| Minimum server specification | Based on sending 1 million messages per day - CPU 2 Core - RAM 2GB - HDD 20GB |
| DBMS | - ORACLE: 10g or higher - MSSQL: Microsoft SQL Server 2012 or higher - MySQL: 5 or higher - DB2: ver 9.7 or higher, pagesize 32 k or higher - PostgreSQL: 9.X or higher - TIBERO: 5 or higher - Sybase: ASE 12.5 or higher |
Installing BizMessage Agent
The order of installing BizMessage Agent is as follows.
Step 1. Opening Firewall
BizMessage Agent receives outgoing requests and result data via TCP/IP socket communication with RSA and AES128 encryption. To communicate with the dk techin message relay server, the partner company needs to ask the salesperson of dk techin to open the TCP/IP firewall before installing the Agent. A dedicated line or Internet network can be used depending on the service type and security level.
BizMessage Server Information
BizMessage servers are divided into operating and staging servers.
- operation server is suitable for sending real messages to customers. It has no limit on the number of outgoing messages, and charges apply.
- Staging server is suitable for testing small amounts of messages with limited number of outgoing messages and is not charged. Even if a message is sent from the staging server, however, the real message is also sent to customer. Therefore, you need to be careful not to send messages incorrectly. The limit on the number of messages that can be sent from the staging server may vary according to the terms of the agreement.
| Item | VIP(Virtual IP) | Network type | PORT/Role |
|---|---|---|---|
| Operating | General 61.109.236.138 |
General | 7000 Message transporting port |
| 7001 Result receiving port |
|||
| Staging | General 61.109.239.146 |
General | 7000 Message transporting port |
| 7001 Result receiving port |
|||
Warning
Please note that the staging server is linked with the operation server, meaning that actual messages are sent to customers. It is crucial to exercise caution when testing small amounts of messages on the staging server.
Step 2. Unzipping Module
BizMsgAgent is a Java-based application that comes in the form of an installation file. To install it, copy the installation file to a preferred location and unzip it. Once installed, the application creates several directories as follows.
| Directory | Sub Directory | Role |
|---|---|---|
| KepAgent | bin | Directory for startup/shutdown scripts |
| conf | Directory for configurations | |
| logs | Log-related directory(created upon startup) | |
| libs | Library-related Directory |
Step 3. Setting System Preferences(agent.ini)
Access the ${app_home}/conf/agent.ini file and configure the environmental settings of the agent.ini file by section as follows.
Common Settings
Configure the common setting as follows.
코드예제agent.ini
[AGENT]
client_id=TEST0001
agent_id=TEST0001001
agent_type=AT         # (AT: Alim Talk, FT: Friend Talk , RCS: RCS, XMS: SMS/LMS/MMS sending only, NAVER: NAVERTalkTalk)
at_type=PUSH          # Type of receiving  Alim Talk  delivery result(PUSH, POLLING)

[GW_INFO]
rx_ip= {sending server IP}
rx_port=7001
tx_ip= {receiving server IP}
tx_port=7000
| Parameter | Required | Description |
|---|---|---|
| client_id | Y |
Client ID issued at the time of contract |
| agent_id | Y |
Agent ID issued at the time of contract |
| agent_type | Y |
Message type |
AT: Alim Talk |
||
FT: Friend Talk |
||
RCS: RCS |
||
XMS: SMS/LMS/MMS |
||
NAVER: NAVER Talk Talk |
||
| at_type | N |
Type to receive AlimTalk delivery result |
PUSH: Push type |
||
POLLING: Polling type |
||
| rx_ip | Y |
Sending server IP |
| rx_port | Y |
Sending port - Default: 7001 |
| tx_ip | Y |
Receiving server IP |
| tx_port | Y |
Receiving port - Default: 7000 |
DBMS Section
Depending on your database type, set the DBMS section of the agent.ini file as follows:
Oracle
코드예제Oracle
[DBMS]
type=oracle
user={agent_username}
password={agent_password}
schema={AGENT_SCHEMA}     # Schema name (In Oracle, schema names are capitalized.)
minimumIdle=10            # Minimum number of DB connections
maximumPoolSize=20        # Maximum number of DB connections
url=jdbc:oracle:thin:@127.0.0.1:1521/ORCL

#failover Connection
#url=jdbc:oracle:thin:@(DESCRIPTION=(FAIL_OVER=ON)(LOAD_BALANCE=off)(ADDRESS=(PROTOCOL=TCP)(HOST=192.168.0.1) (PORT=3000))(ADDRESS=(PROTOCOL=TCP)(HOST=192.168.0.2) (PORT=1521))(CONNECT_DATA=(SERVICE_NAME=ORCL)))
| Parameter | Required | Description |
|---|---|---|
| type | Y |
DBMS type - Fixed to oracle |
| user | Y |
Customer DB account |
| password | Y |
Customer DB account password |
| schema | Y |
Schema name - Write in capital letters |
| minimumIdle | Y |
Minimum number of DB to connect - Default: 10 |
| maximumPoolSize | Y |
Maximum number of DB to connect - Default: 20 |
| url | Y |
Oracle DB connection information - Default: jdbc:oracle:thin:@127.0.0.1:1521/ORCL |
MSSQL
코드예제MSSQL
[DBMS]
type=mssql
user={sa}
password={sapassword}
schema={dbo}             # Schema name ( DB default privileges DataBase Owner )
minimumIdle=10           # Minimum number of DB connections
maximumPoolSize=20       # Maximum number of DB connections
url=jdbc:sqlserver://127.0.0.1:1433;databaseName=AGENT
| Parameter | Required | Description |
|---|---|---|
| type | Y |
DBMS type - Fixed to mssql |
| user | Y |
Customer DB account |
| password | Y |
Password of customer DB account |
| schema | Y |
Schema name(Default setting of the DB) |
| minimumIdle | Y |
Minimum number of DB to connect - Default: 10 |
| maximumPoolSize | Y |
Maximum number of DB to connect - Default: 20 |
| url | Y |
MSSQL URL - Default: jdbc:sqlserver://127.0.0.1:1433;databaseName=AGENT |
MySQL
코드예제MySQL
[DBMS]
type=mysql
user={testuser}
password={testpassword}
schema={agent}            # Schema name( DB name )
minimumIdle=10            # Minimum number of DB connections
maximumPoolSize=20        # Maximum number of DB connections
url=jdbc:mysql://localhost:3306/agent?useSSL=false&useUnicode=true&characterEncoding=UTF-8&allowMultiQueries=true
| Parameter | Required | Description |
|---|---|---|
| type | Y |
DBMS type - Fixed to mysql |
| user | Y |
Customer DB account |
| password | Y |
Password of the customer DB account |
| schema | Y |
Schema name (DB name) |
| minimumIdle | Y |
Minimum number of DB to connect - Default: 10 |
| maximumPoolSize | Y |
Maximum number of DB to connect - Default: 20 |
| url | Y |
MySQL URL - Default: jdbc:mysql://localhost:3306/agent?useSSL=false&useUnicode=true&characterEncoding=UTF-8&allowMultiQueries=true |
DB2
코드예제DB2
[DBMS]
type=db2
user=db2inst
password=db2instpass
schema=AGENT                 # Schema name (DB name)
minimumIdle=10               # Minimum number of DB connections
maximumPoolSize=20           # Maximum number of DB connections
url=jdbc:db2://localhost:50000/AGENT
| Parameter | Required | Description |
|---|---|---|
| type | Y |
DBMS type - Fixed to db2 |
| user | Y |
Customer DB account |
| password | Y |
Password of the customer DB account |
| schema | Y |
Schema name (DB name) |
| minimumIdle | Y |
Minimum number of DB to connect - Default: 10 |
| maximumPoolSize | Y |
Maximum number of DB to connect - Default: 20
|
| url | Y |
DM2 URL - Default: jdbc:db2://localhost:50000/AGENT |
TIBERO
코드예제TIBERO
[DBMS]
type=tibero
user=tuser
password=tpassword
schema=AGENT                 # Schema name
minimumIdle=10               # Minimum number of DB connections
maximumPoolSize=20           # Maximum number of DB connections
url=jdbc:tibero:thin:@127.0.0.1:8629:tibero
| Parameter | Required | Description |
|---|---|---|
| type | Y |
DBMS type - Fixed to tibero |
| user | Y |
Customer DB account |
| password | Y |
Password of customer DB account |
| schema | Y |
Schema name |
| minimumIdle | Y |
Minimum number of DB to connect - Default: 10 |
| maximumPoolSize | Y |
Maximum number of DB to connect - Default: 20 |
| url | Y |
TIBERO URL - Default: jdbc:tibero:thin:@127.0.0.1:8629:tibero |
PostgreSQL
코드예제PostgreSQL
[DBMS]
type=postgresql
user=postgres
password=ppassword
schema=public                    # Schema name
minimumIdle=10                   # Minimum number of DB connections
maximumPoolSize=20               # Maximum number of DB connections
url=jdbc:postgresql://127.0.0.1:5432/postgres
| Parameter | Required | Description |
|---|---|---|
| type | Y |
DBMS type - Fixed to postgresql |
| user | Y |
Customer DB account |
| password | Y |
Customer DB account password |
| schema | Y |
Schema name |
| minimumIdle | Y |
Minimum number of DB to connect - Default: 10 |
| maximumPoolSize | Y |
Maximum number of DB to connect - Default: 20 |
| url | Y |
PostgreSQL URL - Default: jdbc:postgresql://127.0.0.1:5432/postgres |
Sybase
코드예제Sybase
[DBMS]
type=sybase
user=agent
password=agentpassword
schema=dbo                         # Schema name
minimumIdle=10                     # Minimum number of DB connections
maximumPoolSize=20                 # Maximum number of DB connections
url=jdbc:postgresql://127.0.0.1:5432/postgres
| Parameter | Required | Description |
|---|---|---|
| type | Y |
DBMS type - Fixed to sybase |
| user | Y |
Customer DB account |
| password | Y |
Password of customer DB account |
| schema | Y |
Schema name |
| minimumIdle | Y |
Minimum number of DB to connect - Default: 10 |
| maximumPoolSize | Y |
Maximum number of DB to connect - Default: 20 |
| url | Y |
Sybase URL - Default: jdbc:postgresql://127.0.0.1:5432/postgres |
TABLE Section
To modify the default environment settings of the table, it is necessary to edit the agent.ini file according to the specified format. In the TABLE section, the value to the right of the = sign is the default value, which can be changed as needed.
코드예제TABEL Section
[TABLE]
# For Sybase and PostgreSQL, table names must be all lowercase, and other DBMSs must be written in uppercase.
# When using only one table for a outgoing table and a result table, use the same name in the tables.

# Sequence name(required to use auto_increment for MySQL, and identity for Sybase and MSSQL)
alimtalk_sequence=seq_k

# Alim Talk request table
alimtalk_message=k_message

# Alim Talk result table
alimtalk_messagelog=k_message_log

# Same as above sequence
ftalk_sequence=seq_f

# Friend Talk request table
ftalk_message=k_f_message

# Friend Talk result table
ftalk_message_log=k_f_message_log

# RCS request table
rcs_message=k_rcs_message

# RCS result table
rcs_message_log=k_rcs_message_log

# PK sequence of XMS table
xms_sequence=SEQ_XMS_MESSAGE

# XMS sending table
xms_message=XMS_MESSAGE

# XMS log table
xms_message_log=XMS_MESSAGE_LOG

# XMS image table
xms_contents=XMS_MESSAGE_CONTENTS

# PK sequence of NAVER table
naver_sequence=SEQ_NAVER_MESSAGE

# NAVER sending table
naver_message=NAVER_MESSAGE8

# NAVER log table
naver_message_log=NAVER_MESSAGE_LOG8

# A separate script is required to create tables for each DB.
createTable=true

# Whether to create a log table monthly
logDivision=true

# If one log table is used when the outgoing table and the result table are the same, the data from the specified number of days ago will be deleted.
logDataDelete=10

# The number of inquiries for one inquiry in the messaging service(defaut : 1000)
at_fetch_count=1000
at_img_fetch_count=100
ft_fetch_count=1000
ft_img_fetch_count=100
rcs_fetch_count=1000
rcs_img_fetch_count=100
xms_fetch_count=1000
xms_img_fetch_count=100
naver_fetch_count=1000
Table Description
Table and data management is crucial for the BizMessage Agent as it operates based on the database. The following describes the tables used by the BizMessage Agent.
표Table Description| Table name | Required | Description |
|---|---|---|
| K_MESSAGE | Y |
To request to send Alim Talk, and SMS/LMS/MMS |
| K_MESSAGE_LOG | N |
Log table of Alim Talk, and SMS/LMS/MMS - Table to store the processed data after sending an Alim Talk. - Composed of month, year, and a single table according to the setting. |
| SEQ_K_MESSAGE | N |
Table sequence |
| F_MESSAGE | Y |
To request to send Friend Talk |
| F_MESSAGE_LOG | N |
Log table for Friend Talk - Table to store the processed data after sending Friend Talk. - Composed of month, year, and a single table according to the setting. |
| SEQ_F_MESSAGE | Y |
Table sequence |
| RCS_MESSAGE | Y |
To request to send RCS |
| RCS_CONTENTS | Y |
To manage RCSMMS contents - To send RCSMMS, you need to upload an image in advance and get approval before sending. |
| RCS_MESSAGE_LOG | N |
RCS log table - A table to store the processed data after sending RCS. - Composed of month, year, and a single table depending on the settings. |
| SEQ_RCS_MESSAGE | N |
Table sequence |
| K_BLACK_LIST | N |
Black list table - A list not to send a message to a customer's phone number registered as a refusal to receive messages. |
| K_AGENT | N |
Table to configure HA of the Agent - A table to manage the state of the Agent when configuring HA. |
| XMS_MESSAGE | Y |
A dedicated table for sending SMS/LMS/MMS |
| XMS_MESSAGE_LOG | N |
A log table for sending SMS/LMS/MMS |
| NAVER_MESSAGE | Y |
To request to send NAVER Talk Talk |
| NAVER_MESSAGE_LOG | N |
Log table for NAVER Talk Talk - Table to store the processed data after sending NAVER Talk Talk - Composed of month, year, and a single table according to the setting. |
| SEQ_NAVER_MESSAGE | N |
Table sequence |
HA Section(Optional)
The [HA] section is used when setting Active-Standby for agent server redundancy configuration.
코드예제HA Section
[HA]
# HA use (default=false)
ha_use=false

# For Sybase and Postgresql, all table names are set in lower case, and other DBMSs are written in upper case.
ha_table_name=k_agent

# M : master, S : slave
ha_agent_type=M

# Active – Stanby
Agent redundancy check time(seconds)
ha_timeout_sec=60
| Parameter | Required | Description |
|---|---|---|
| ha_use | Y |
Whether to user HA (High Availability) |
true: to use |
||
false(default): not to use |
||
| ha_table_name | Y |
Table name - Sybase and Postgresql are written in lower case - Other DBMSs are written in upper case |
| ha_agent_type | Y |
HA agent type |
M(default): master |
||
S: slave |
||
| ha_timeout_sec | Y |
Agent redundancy check time(seconds) - Default: 60 |
FILE_DEL Section
The [File_DEL] section is used to delete temporary files for data transfer.
코드예제FILE_DEL Section
[FILE_DEL]
# Files created by the agent are deleted on a daily basis.
log=4
| Parameter | Required | Description |
|---|---|---|
| log | Y |
Files created by the agent are deleted after the set date.(unit: day) - Default: 4 |
JOB_EXPIRED Section
The [JOB_EXPIRED] section is used to set the effective time when sending a message.
코드예제JOB_EXPIRED Section
[JOB_EXPIRED]
#1440 : 1day

# Effective time to send a single message (unit: minute)
(Messages are sent only within the scheduled time)
small_fetch_expired_min=1440

# Effective time to send messages in bulk(unit: minute)
(Messages are sent only within the scheduled time)
large_fetch_expired_min=1440
| Parameter | Required | Description |
|---|---|---|
| small_fetch_expired_min | Y |
Effective time to send a single message. Messages are sent only within the scheduled time(unit: minute) - Default: 1440 |
| large_fetch_expired_min | Y |
Effective time to send messages in bulk. Messages are sent only within the scheduled time (unit: minute) - Default: 1440 |
White List Section(Optional)
The [WHITE_LIST] section is used to send messages only to the phone number entered in mobile_no.
코드예제White List Section
[WHITE_LIST]
# Whether to use
use=false
# To send a message only to registered numbers
mobile_no=01999999999,09999999999
| Parameter | Required | Description |
|---|---|---|
| use | Y |
Whether to use the White List section |
true: to use |
||
false(default): Not to use |
||
| mobile_no | Y |
To send a message only to registered numbers - Default: 01999999999,09999999999 |
Black List Section(Optional)
The [BLACK_LIST] section is used to manage the blacklist using a DB table. Messages will not be sent to phone numbers registered in the DB table.
코드예제Black List Section
[BLACK_LIST]
# Whether to use
use=false
# Blacklist DB table name
blacklist_table=K_BLACKLIST
| Parameter | Required | Description |
|---|---|---|
| use | Y |
Whether to use the Black List section |
true: To use |
||
false(default): Not to use |
||
| blacklist_table | Y |
Table name of the Blacklist DB - Default: K_BLACKLIST |
Server IP Section
The [SERVER_IP] section is used to check the IP of the server device where the agent is installed. It is required to enter the IP set at the time of contract.
코드예제Server IP Section
[SERVER_IP]
# IP of the server where the agent is installed
ip=127.0.0.1
| Parameter | Required | Description |
|---|---|---|
| ip | Y |
IP of the server where the Agent is installed - Default: 127.0.0.1 |
Custom Column Section(Optional)
The [CUSTOM_CULOMN] section allows customers to add a column to a table. This section includes the following parameters.
코드예제Custom Column Section
[CUSTOM_CULOMN]
# Use custom column when you need a column to add

# Add a column when creating a table
# create=CUST_1 TYPE VARCHAR(1) DEFAULT 'X' NOT NULL , CUST_2 VARCHAR(1) DEFAULT 'N' NOT NULL

# Add a ‘select’ column when migrating from the message request table to the result table
# select=CUST_1, CUST_2
| Parameter | Required | Description |
|---|---|---|
| create | Y |
This parameter is used when additional columns are required in the base table. - Separate multiple entries using a comma( ,)- Enter as EX_COL VARCHAR(1000)- If you have existing request and delivery result tables, you will need to manually drop both tables and rerun the agent, or manually create additional columns as ALTER in both tables. |
| select | Y |
This parameter is used to recognize the added column when receiving the message delivery result when a custom column is added. - Specify only column names such as EX_COL1, EX_COL2 |
Code Mapping Section(Optional)
The [CODE_MAPPING] section provides the function of mapping result codes to customer codes. Write each code to be mapped separated by
| in the format of #{result code}|#{customer result code to be mapped}.
코드예제Code Mapping Section
# Whether to use result code mapping (Use: true, Not Use: false)
[CODE_MAPPING]
# Whether to use custom result codes for each message type
alimtalk_code_mapping_use=false
sms_code_mapping_use=false
rcs_code_mapping_use=false
naver_code_mapping_use=false
| Parameter | Description |
|---|---|
| alimtalk_code_mapping_use | Whether to use Alim Talk custom result code |
false(default): Not to use |
|
true: to use |
|
Example when set to true${AGENT_HOME}/conf/mapping/alimtalk_code_mapper.txt [ALIMTALK_CODE_MAPPING] #{result code}|#{customer result code to map} API_200|SUCC API_201|FAIL API_999|999 |
|
| sms_code_mapping_use | Whether to use SMS custom result codes |
false(default): Not to use |
|
true: to use |
|
Example when set to true ${AGENT_HOME}/conf/mapping/sms_code_mapper.txt [SMS_CODE_MAPPING] #{result code}|#{customer result code to map} API_200|SUCC API_201|FAIL API_999|999 |
|
| rcs_code_mapping_use | Whether to use RCS custom result codes |
false(default): Not to use |
|
true: to use |
|
Example when set to true${AGENT_HOME}/conf/mapping/rcs_code_mapper.txt [SMS_CODE_MAPPING] #{result code}|#{customer result code to map} API_200|SUCC API_201|FAIL API_999|999 |
|
| naver_code_mapping_use | Whether to use Naver Talk Talk custom result code |
false(default): Not to use |
|
true: to use |
|
Example when set to true ${AGENT_HOME}/conf/mapping/naver_code_mapper.txt [NAVER_CODE_MAPPING] #{result code}|#{customer result code to map} API_200|SUCC API_201|FAIL API_999|999 |
Step 4. Setting Server OS
This chapter describes how to set each server OS.
Windows Family
To set up the environment for a Windows-based server, go to the specified path and follow the steps provided.
-
After moving to the
${app_home}/binpath, configure the environment in the kakaoAgent.xml file.- Enter the path where the agent is installed in
{app_home}.
코드예제kakaoAgent.xml
<?xml version="1.0" encoding="UTF-8"?> <service> <!-- Absolute path where the agent is installed --> <env name="AGENT_HOME" value="C:\PushAgent\C1A1-at"/> <!-- Absolute path where JDK is installed --> <env name="JAVA_HOME" value="C:\java\jdk1.6.0_45"/> <env name="ENCODING" value="UTF-8"/> <env name="OS_NAME" value="WINDOW"/> <env name="XMS" value="-Xms256m"/> <env name="XMX" value="-Xmx256m"/> <env name="GC_CONF1" value=""-XX:+UseParallelGC -XX:PermSize=128M -XX:MaxPermSize=128M -XX:NewSize=256M -XX:MaxNewSize=256M "/> <env name="GC_CONF2" value="-XX:+HeapDumpOnOutOfMemoryError -XX:HeapDumpPath"/> <!-- Possible to change the Agent name --> <id>KakaoPush</id> <!-- Possible to change the name to be registered in the Windows service --> <name>KakaoPush</name> <description>Kakao Alimtalk/Friendtalk Push Windows Service</description> <executable>%JAVA_HOME%\bin\java</executable> <arguments> -server %XMS% %XMX% -Dfile.encoding=%ENCODING% -Dos.name=%OS_NAME% -DAGENT_HOME=%AGENT_HOME% %GC_CONF1% %GC_CONF2%=%AGENT_HOME% -jar %AGENT_HOME%\kakaoAgent.jar start</arguments> <logmode>none</logmode> <startmode>Automatic</startmode> </service> - Enter the path where the agent is installed in
-
Run
${app_home}/bin/kakaoAgent.exe. -
To register the service, execute
${app_home}/bin/service.batwith administrator privileges.NOTE
In case that the kakaoAgent.xml is modified, remove the registered service and then register again.
표Service Registration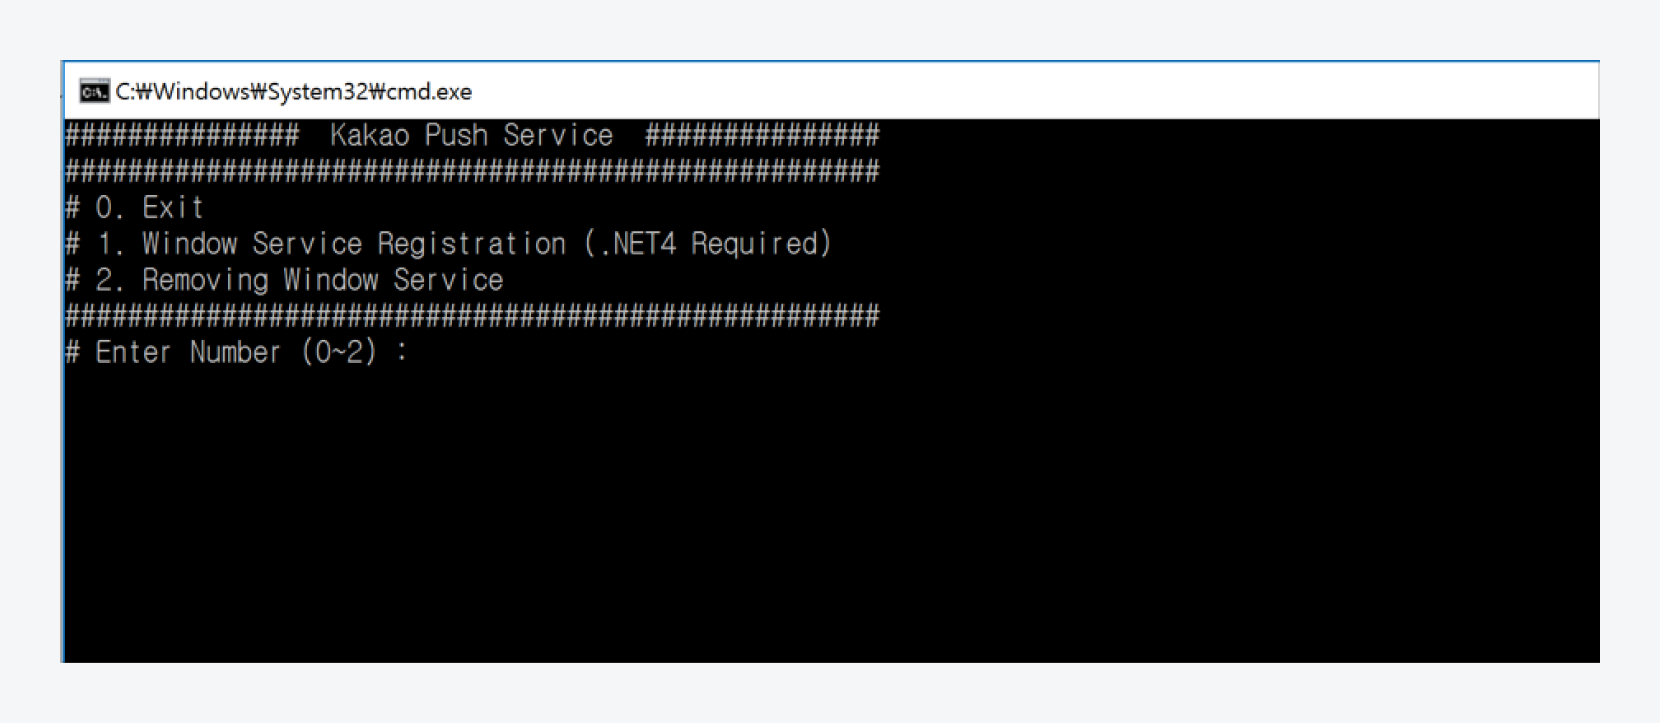 그림 run administrator mode
category Description 0 Exit 1 Windows service registration 2 Uninstall Windows Services -
Go to Services in Windows and verify that KakapPush is registered.
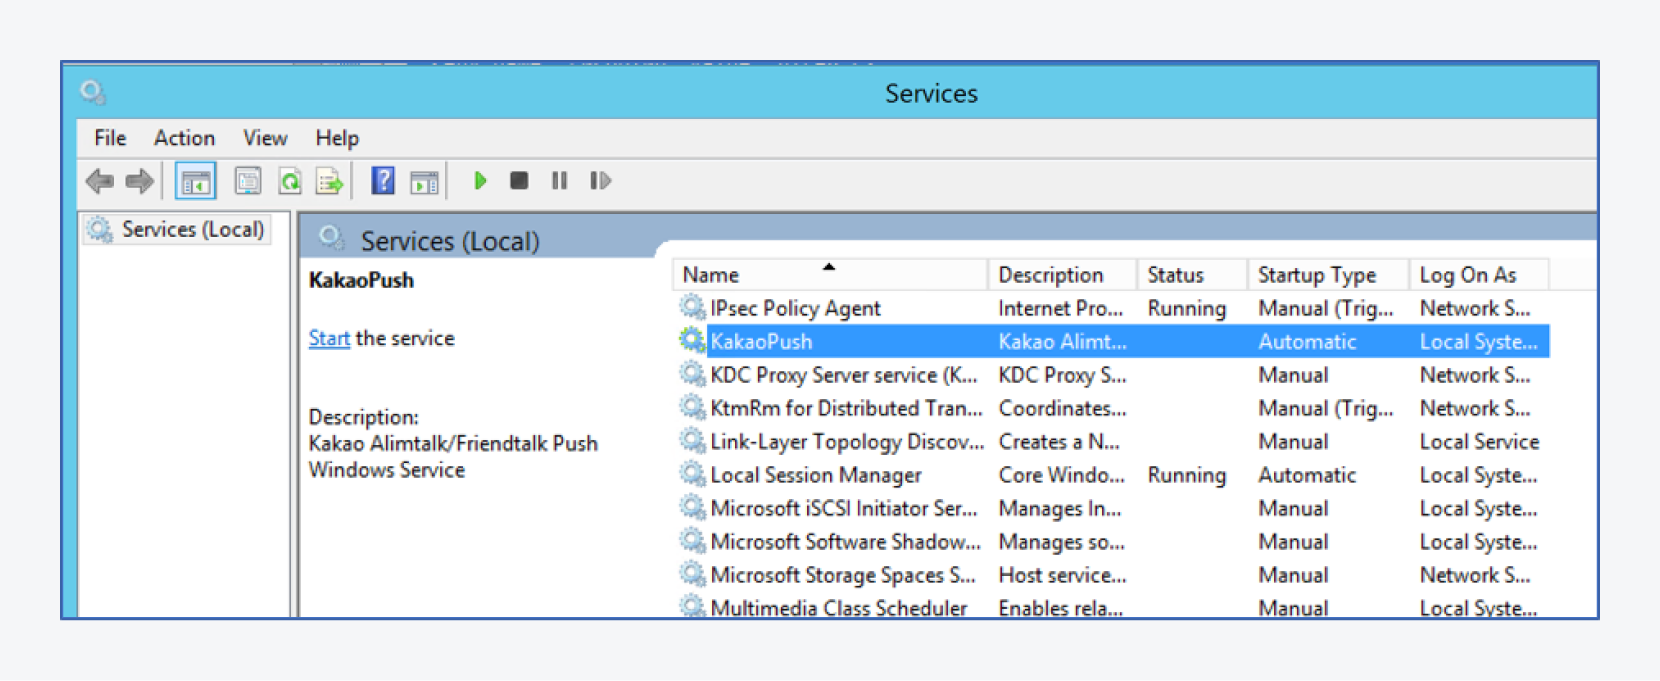 그림KakaoPush registration confirmation
Unix Section
To perform environment settings for the Unix family, navigate to the following path:
-
Go to
${app_home}/bin/env.shto set the environment.코드예제env.sh
#!/bin/sh # Process name upon startup SERVER_NAME="KAKAO_AGENT" # Absolute path where Agent is installed AGENT_HOME="/Users/agent_at" # Absolute path where JDK is installed JAVA_HOME="/Usr/bin/" ENCODING="UTF-8" XMS="-Xms256m" XMX="-Xmx256m" GC_CONF1=""-XX:+UseParallelGC -XX:PermSize=128M -XX:MaxPermSize=128M -XX:NewSize=256M -XX:MaxNewSize=256M" GC_CONF2="-XX:+HeapDumpOnOutOfMemoryError -XX:HeapDumpPath" # User name of the system to run the agent SETUSER="root" RUNNER=`whoami` …. -
Execute the following command to run or shut down the service.
-
The chmod 755 permission is required to run and shut down the Agent.
표run and shut down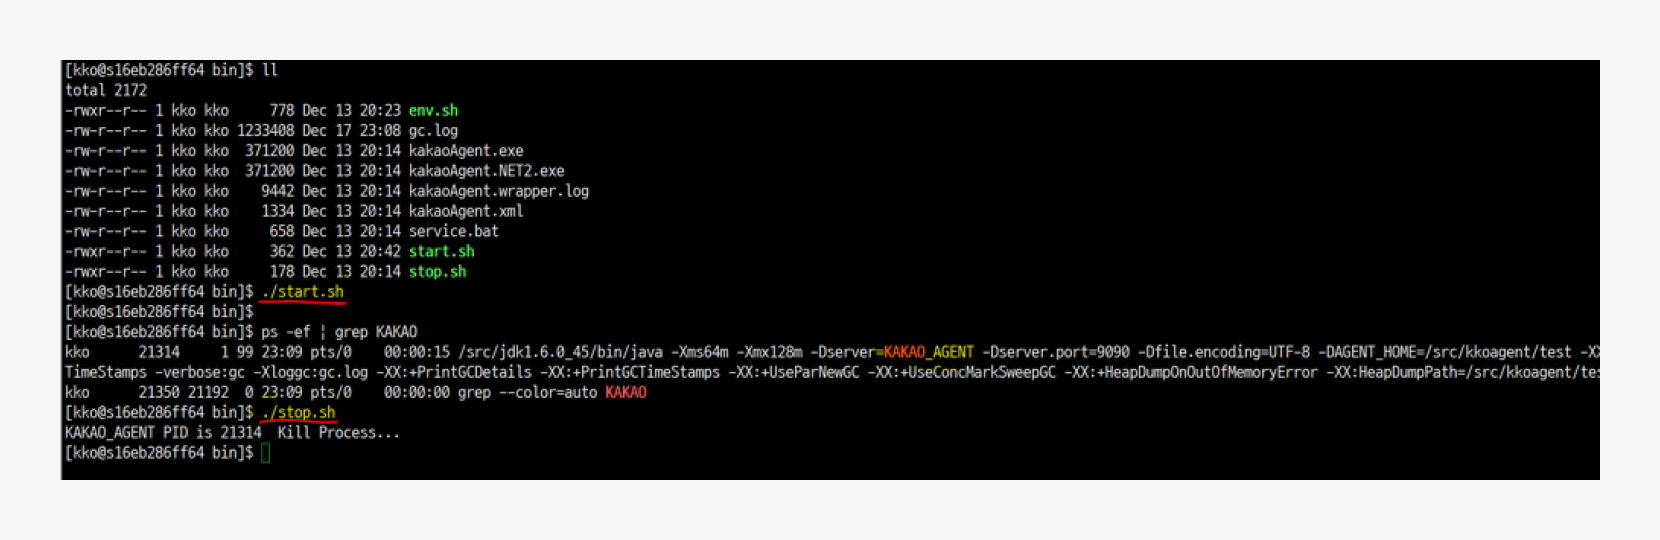 그림run and shut down
Category Description start.shto run the process stop.shto end the process
-
-
You can check the following service log in the app_home directory.
표Service log 그림Check service log
Log name Description logs/${yyyy}Log files are transferred to the yyyy/mm folder for each date. logs/start.logRun log logs/err.logError log logs/job.logJob operation log