View Template 수정
SDK 내부에는 응답 결과 출력 시 음성 답변과 함께 UI 템플릿 형식인 View Template이 구현되어 있습니다. SDK 기본 설정으로, View Template은 디바이스의 세로형(파샬형)/가로형에 따라서 디바이스 사이즈 x 해상도에 맞게 동작합니다. SDK에서 제공하는 기본 View Template을 그대로 사용할 수도 있지만, View Tempalte의 레이아웃 디자인이나 사이즈 등을 수정하는 것도 가능합니다.
이 문서에서는 View Template의 타이틀 텍스트 색상을 흰색(기본값)에서 빨간색으로 변경하는 시나리오와 관련한 샘플 코드를 제공합니다.
| Type | 발화 예 | 캡처 | 레퍼런스 (Sample App) |
|---|---|---|---|
| IMAGE | 날씨 알려줘 | 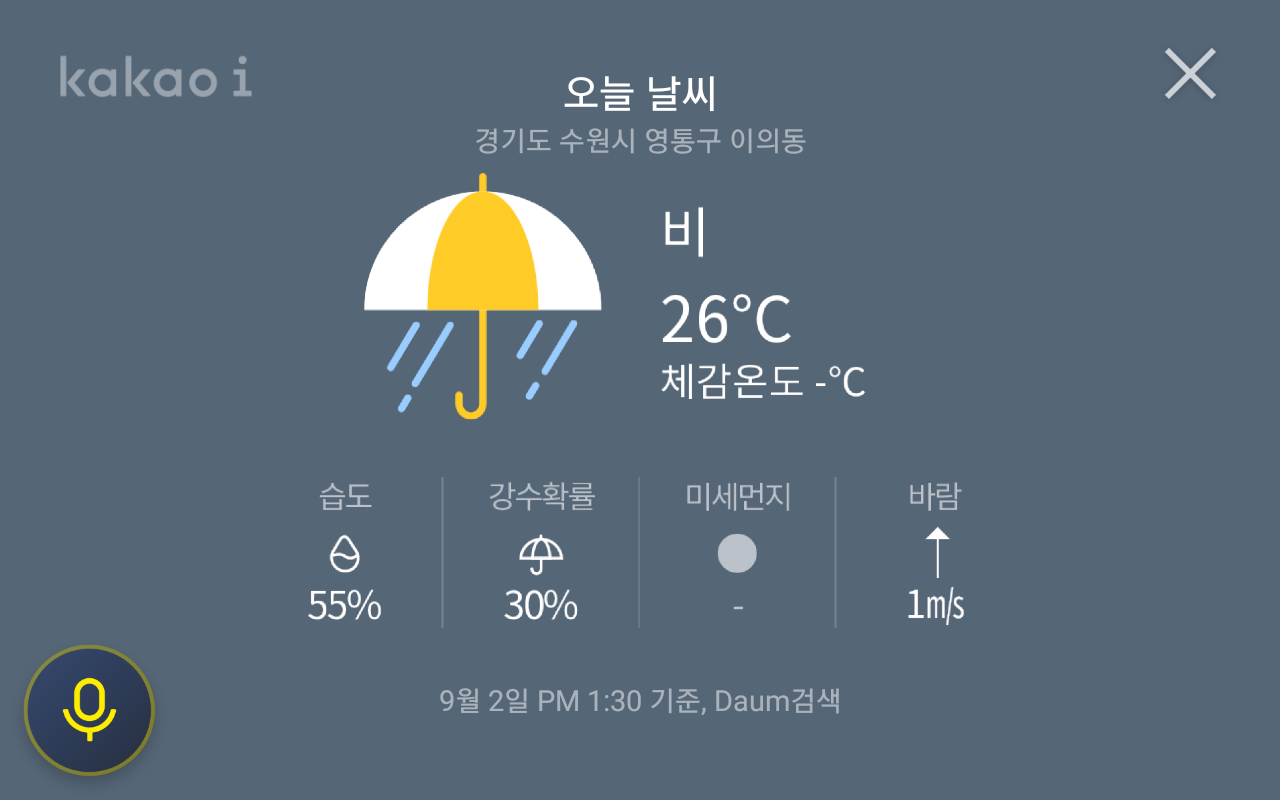 |
custom_template_full_image.xml |
| FULL_TEXT | 세종대왕이 누구야 | 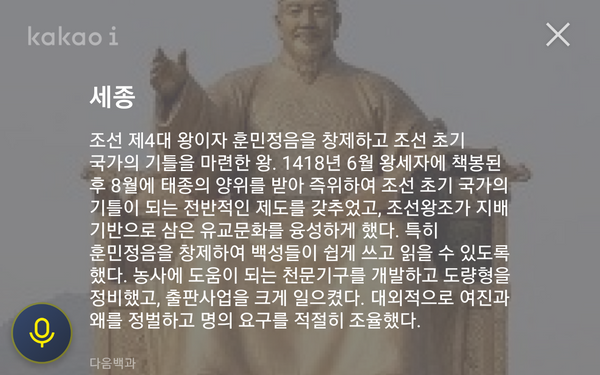 |
custom_template_layout_full_text.xml |
| IMGAE_TEXT | 아이유가 누구야 |  |
custom_template_layout_image_text.xml |
| KEYWORD_TEXT | 오늘 며칠이야 |  |
custom_template_layout_keyword_text.xml |
| LIST(HORIZONTAL) | KBO 리그 순위 | 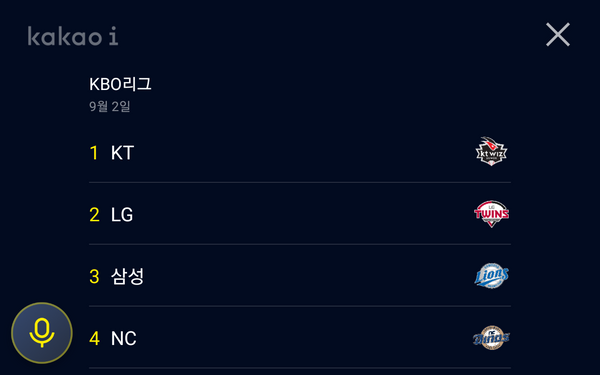 |
custom_template_layout_list.xml custom_template_list_item_horizontal.xml |
| LIST(VERTICAL) | JTBC 편성표 | 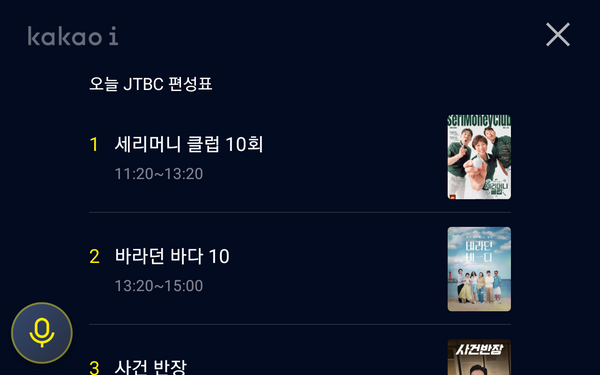 |
custom_template_layout_list.xml custom_agent_template_list_item_vertical.xml |
| CAROUSEL | 박스오피스 순위 | 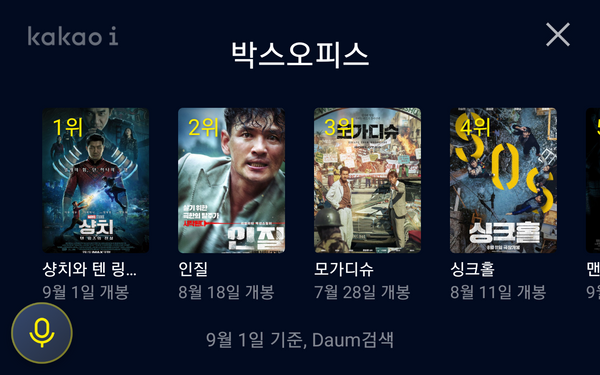 |
custom_template_layout_list.xml custom_template_list_item_carousel.xml |
안내
View Template의 구성, 속성, 정책 및 유의사항 등의 자세한 설명은 [카카오 i 기술문서] View Template 문서를 참고하시기 바랍니다.
레이아웃 수정 시나리오
다음은 IMAGE 타입의 View Template의 타이틀 텍스트 색상을 흰색(기본값)에서 빨간색으로 바꾸는 시나리오입니다.
-
KakaoIWallPad init 시점에 View Template 커스텀 레이아웃이 포함된 TemplateRenderer를 주입합니다.
코드예제TemplateRenderer 주입
KakaoIWallpad.with(this, BuildConfig.KAKAO_I_PHASE) .setTemplateRenderer(object: TemplateRenderer{ ... }) -
Sample App에 있는 CustomRenderer를 참고하여 TemplateRenderer를 구현합니다.
코드예제TemplateRenderer 구현
.setTemplateRenderer(object : TemplateRenderer() { override fun inflateView(parent: ViewGroup, model: TemplateModel): View { when (model.renderBody.type) { RenderBody.TYPE_IMAGE -> FullImageViewHolder(parent, R.layout. custom_template_full_image) else -> return super.inflateView(parent, model) }.let { viewHolder -> model.renderBody.data?.background?.color?.takeIf { it.isNotBlank () }?.let { parent.setBackgroundColor(Color.parseColor(it)) } ?: run { parent.setBackgroundColor(Color.TRANSPARENT) } viewHolder.bind(model) return viewHolder.itemView } } }) -
표. SDK 제공 기본 View Template에서 변경하고자 하는 레이아웃(custom_template_full_image.xml)을 Android Project로 복사하여 가져옵니다.
-
View Template 레이아웃을 만들어 원하는 항목을 수정합니다.
안내
View Template 수정 시 부록 A. Sample App 수정에 있는 레이아웃을 복사 후 디자인 요소만 수정하는 것을 권장합니다.코드예제레이아웃 변경
<?xml version="1.0" encoding="utf-8"?> <androidx.constraintlayout.widget.ConstraintLayout xmlns:android="http://schemas.android. com/apk/res/android" xmlns:app="http://schemas.android.com/apk/res-auto" xmlns:tools="http://schemas.android.com/tools" android:layout_width="match_parent" android:layout_height="match_parent" android:background="@android:color/transparent" tools:background="#020b20"> <ImageView android:id="@+id/ivBI" android:layout_width="@dimen/kakaoi_sdk_agent_logo_width" android:layout_height="@dimen/kakaoi_sdk_agent_logo_height" android:layout_marginStart="@dimen/kakaoi_sdk_agent_logo_left_margin" android:layout_marginTop="@dimen/kakaoi_sdk_agent_logo_top_margin" android:src="@drawable/kakaoi_sdk_agent_ico_bar_logo_kakaoi" app:layout_constraintStart_toStartOf="parent" app:layout_constraintTop_toTopOf="parent" tools:ignore="ContentDescription" /> <ImageView android:id="@+id/image" android:layout_width="0dp" android:layout_height="0dp" android:scaleType="fitCenter" android:visibility="gone" app:layout_constrainedHeight="true" app:layout_constrainedWidth="true" app:layout_constraintBottom_toBottomOf="parent" app:layout_constraintEnd_toEndOf="parent" app:layout_constraintHeight_percent="0.7" app:layout_constraintWidth_percent="0.7" app:layout_constraintStart_toStartOf="parent" app:layout_constraintTop_toTopOf="parent" tools:src="@tools:sample/avatars" tools:visibility="visible" /> <TextView android:id="@+id/title" android:layout_width="0dp" android:layout_height="0dp" android:autoSizeTextType="uniform" android:ellipsize="end" android:gravity="center" android:maxLines="1" android:textColor="@color/kakaoi_sdk_agent_text_white" android:textSize="@dimen/kakaoi_sdk_agent_fullimage_title_text_size" android:visibility="gone" app:layout_constraintBottom_toTopOf="@id/subtitle" app:layout_constraintEnd_toEndOf="@id/image" app:layout_constraintHeight_percent="0.07" app:layout_constraintStart_toStartOf="@id/image" app:layout_constraintWidth_percent="0.7" tools:ignore="UnusedAttribute" tools:text="타이틀 텍스트\n두 줄까지 표시" tools:visibility="visible" /> <TextView android:id="@+id/subtitle" android:layout_width="0dp" android:layout_height="0dp" android:autoSizeTextType="uniform" android:ellipsize="end" android:gravity="center" android:maxLines="1" android:textColor="@color/kakaoi_sdk_agent_text_white_50" android:textSize="@dimen/kakaoi_sdk_agent_fullimage_subtitle_text_size" android:visibility="gone" app:layout_constraintEnd_toEndOf="@id/image" app:layout_constraintHeight_percent="0.05" app:layout_constraintStart_toStartOf="@id/image" app:layout_constraintTop_toTopOf="@id/image" app:layout_constraintWidth_percent="0.7" tools:ignore="UnusedAttribute" tools:text="서브 타이틀 텍스트" tools:visibility="visible" /> <TextView android:id="@+id/source" android:layout_width="0dp" android:layout_height="0dp" android:autoSizeTextType="uniform" android:ellipsize="end" android:gravity="center" android:maxLines="1" android:textColor="@color/kakaoi_sdk_agent_text_white_50" android:textSize="@dimen/kakaoi_sdk_agent_fullimage_source_text_size" android:visibility="gone" app:layout_constraintTop_toBottomOf="@id/image" app:layout_constraintEnd_toEndOf="@id/image" app:layout_constraintHeight_percent="0.05" app:layout_constraintStart_toStartOf="@id/image" app:layout_constraintWidth_percent="0.7" tools:text="소스 텍스트" tools:visibility="visible" tools:ignore="UnusedAttribute" /> <include layout="@layout/kakaoi_sdk_agent_template_wide_buttons" android:layout_width="wrap_content" android:layout_height="wrap_content" android:layout_marginBottom="@dimen/ kakaoi_sdk_agent_full_image_sub_view_template_bottom_margin" app:layout_constraintBottom_toBottomOf="parent" app:layout_constraintEnd_toEndOf="parent" app:layout_constraintStart_toStartOf="parent" /> </androidx.constraintlayout.widget.ConstraintLayout> -
id가 title인 TextView의 색상을 white(기본값)에서
red로 변경합니다.코드예제색상값 변경
<TextView android:id="@+id/title" android:layout_width="0dp" android:layout_height="0dp" android:autoSizeTextType="uniform" android:ellipsize="end" android:gravity="center" android:maxLines="1" android:textColor="@android:color/holo_red_dark" android:textSize="@dimen/kakaoi_sdk_agent_fullimage_title_text_size" android:visibility="gone" app:layout_constraintBottom_toTopOf="@id/subtitle" app:layout_constraintEnd_toEndOf="@id/image" app:layout_constraintHeight_percent="0.07" app:layout_constraintStart_toStartOf="@id/image" app:layout_constraintWidth_percent="0.7" tools:ignore="UnusedAttribute" tools:text="타이틀 텍스트\n두 줄까지 표시" tools:visibility="visible" /> -
View Template이 제대로 수정되었는지 확인합니다.
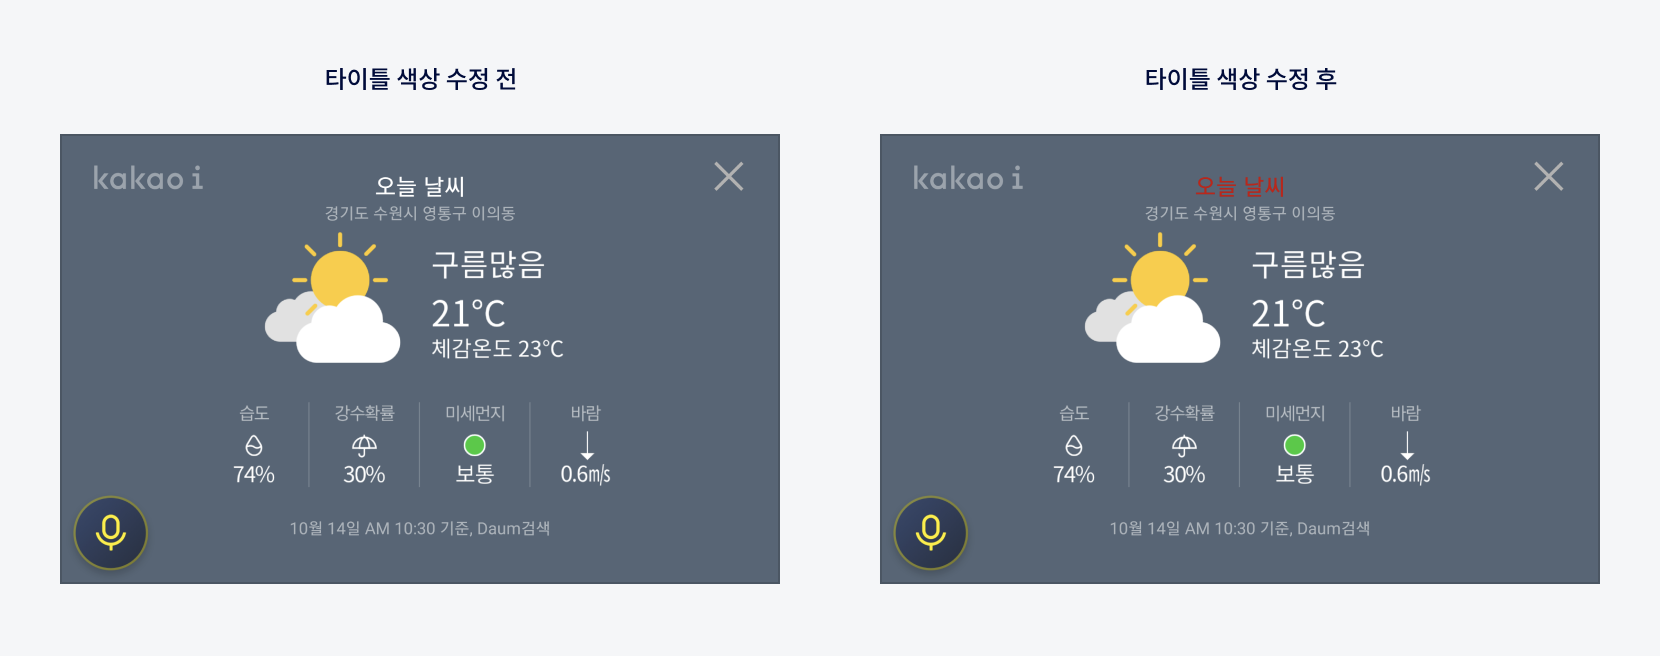 그림View Template 수정
Sample App의 CustomRenderer.kt
TemplateRenderer의 구현체인 inflateView 메서드를 재 정의하고, 각 타입에 따른 View Template의 레이아웃을 주입합니다.
원하는 타입의 View Tempalte만 when 문에서 정의하고, 나머지는 SDK에서 이미 정의되어 있는 View Template을 사용할 수 있습니다.
코드예제CustomRenderer
class CustomRenderer : TemplateRenderer() {

    override fun inflateView(parent: ViewGroup, model: TemplateModel): View {
        when(model.renderBody.type) {
            // 수정하려는 View Template 타입의 레이아웃을 재 정의
            RenderBody.TYPE_LIST ->
                ListViewHolder(
                    parent, R.layout.custom_template_layout_list,
                    if (model.renderBody.data?.itemLayout == HORIZONTAL) {
                        R.layout.custom_template_list_item_horizontal
                    } else {
                        R.layout.custom_agent_template_list_item_vertical
                    }
                )
            RenderBody.TYPE_CAROUSEL -> ListViewHolder(parent, R.layout.custom_template_layout_carousel, R.layout.custom_template_list_item_carousel)
            RenderBody.TYPE_IMAGE_TEXT -> ImageTextViewHolder(parent, R.layout.custom_template_layout_image_text)
            RenderBody.TYPE_IMAGE -> FullImageViewHolder(parent, R.layout.custom_template_full_image)
            RenderBody.TYPE_FULL_TEXT -> FullTextViewHolder(parent, R.layout.custom_template_layout_full_text)
            RenderBody.TYPE_KEYWORD_TEXT -> KeywordTextViewHolder(parent, R.layout.custom_template_layout_keyword_text)
            // 그 외에는 SDK에서 정의한 View Template을 사용
            else -> return super.inflateView(parent, model)
        }.let { viewHolder ->
            model.renderBody.data?.background?.color?.takeIf { it.isNotBlank() }?.let {
                parent.setBackgroundColor(Color.parseColor(it))
            } ?: run {
                parent.setBackgroundColor(Color.TRANSPARENT)
            }
            viewHolder.bind(model)
             return viewHolder.itemView
        }
    }
}

private const val HORIZONTAL = "HORIZONTAL"